Overview
In this assignment, you will add to a provided codebase to evaluate arithmetic expressions in infix and postfix notation. You are provided with a grammar that represents an arithmetic expression as well as a lexer for such expressions. You are also provided with a parser for infix expressions. You will understand how to use use recursive types (such as an abstract syntax tree) and stacks for this purpose. You will also learn some aspects of the tools we use: running
mainusing Gradle, passing command line arguments, and creating JAR files to more easily distribute your application/program.
❗️For certain aspects of this assignment, you may have to make adjustments based on the version of Gradle that you are using.
ℹ️ Also read: The Build Process and Build Tools
Learning Outcomes
Lexical Analysis and Parsing
Identify and describe the role of a lexer in tokenizing input strings into meaningful units (tokens) in programming languages.
Explain the function of a parser in interpreting sequences of tokens based on grammatical rules to produce structured data representations.
Understand and apply recursive descent parsing to handle operator precedence and expression grouping in arithmetic expressions.
Abstract Syntax Tree (AST) Construction and Evaluation
Examine how an Abstract Syntax Tree (AST) to represent an arithmetic expression can be created, preserving the structure and operator precedence of the input expression.
Extend the AST to evaluate expressions by implementing evaluate() methods in AST node classes, using a modular, object-oriented approach.
Implement and differentiate between infix and postfix evaluation by creating separate evaluation methods, recognizing the differences in operator placement and evaluation order.
Postfix Evaluation Using a Stack-Based Approach
Demonstrate understanding of postfix notation and its evaluation mechanics by implementing a stack-based evaluator for postfix expressions.
Analyze the advantages of postfix notation in terms of simplicity and efficiency for expression evaluation, particularly in environments where operator precedence can be complex.
Implement a stack-based algorithm for postfix evaluation, utilizing the lexer for token generation and correctly applying operators based on token type.
Software Project Setup and Execution Using Gradle
Configure Gradle to run a specific main method, understanding the structure and purpose of build.gradle files.
Pass and access command-line arguments in a Java program to dynamically influence program behavior based on user input.
Explain the purpose and advantages of JAR files in software development, including ease of distribution, platform independence, and deployment simplification.
Software Engineering in Practice
Use Gradle to create executable JAR files and demonstrate the process of running a Java application from the command line using JAR files.
Reflect on and apply principles of object-oriented design in creating subclasses for individual AST nodes, emphasizing modularity, maintainability, and readability.
Grammar for Arithmetic Expressions
You should first review the grammar for arithmetic expressions, which looks like this (and there are other descriptions that are equally valid):
<expression> ::= <term> | <expression> "+" <term> | <expression> "-" <term>
<term> ::= <factor> | <term> "*" <factor> | <term> "/" <factor>
<factor> ::= <exponent> | <factor> "^" <exponent>
<exponent> ::= <primary> | "-" <primary>
<primary> ::= <number> | "(" <expression> ")"
<number> ::= <integer> | <integer> "." <digits>
<integer> ::= <digit> | <digit> <integer>
<digits> ::= <digit> | <digit> <digits>
<digit> ::= "0" | "1" | "2" | "3" | "4" | "5" | "6" | "7" | "8" | "9"
Expressions (<expression>)
- Represents the top-level structure, allowing for addition (
+) and subtraction (-) operations. - Expressions are composed of terms combined with
+and-, and this rule has the lowest precedence in the expression hierarchy.
Terms (<term>)
- Represents multiplication (
*) and division (/) operations, which have higher precedence than addition and subtraction. - Terms are composed of factors combined with
*and/.
Factors (<factor>)
- Handles exponentiation (
^), which has higher precedence than multiplication and division. - Exponentiation is right-associative, so expressions like
2^3^4are parsed as2^(3^4).
Exponents (<exponent>)
- Supports unary negation, allowing for negative numbers (e.g.,
-5). - This rule distinguishes between a simple primary value and a negated one.
Primary Values (<primary>)
- Represents the fundamental building blocks of expressions: numbers and sub-expressions enclosed in parentheses
( ). - Parentheses allow for grouping, which can override standard operator precedence.
Numbers (<number>)
- Supports both integers and floating-point numbers.
- Floating-point numbers are represented by an integer part, a decimal point ., and a sequence of digits.
Integers and Digits (<integer>, <digits>, and <digit>)
- Defines sequences of digits for integers and the fractional part of floating-point numbers.
- Represents individual numeric characters from 0 to 9.
This grammar for arithmetic expressions avoids the use of or the null terminal. We could have reduced the number of production rules if we used .
Lexers and Parsers
Now, you should understand and implement the process of breaking down an input expression into tokens using a lexer, and then structuring those tokens into an abstract syntax tree (AST) with a parser.
What are Abstract Syntax Trees?
An Abstract Syntax Tree (AST) is a hierarchical, tree that represents the syntax of code in a simplified, abstracted form. Each node in the AST represents a construct (such as an operation, variable, or literal) found in the source code, but unlike the raw syntax, it excludes unnecessary syntax details (like parentheses in expressions), focusing instead on the semantic structure.
For an arithmetic expression like
3 + 5 * (2 - 8), the AST would look like this:
      +
     / \
    3   *
       / \
      5   -
         / \
        2   8
A compiler constructs an AST when compiling a program. Here is an example using a snippet of Java code:
int a = 10;
int b = 5;
int result = a + b * (a - b);
The corresponding AST would look like this:
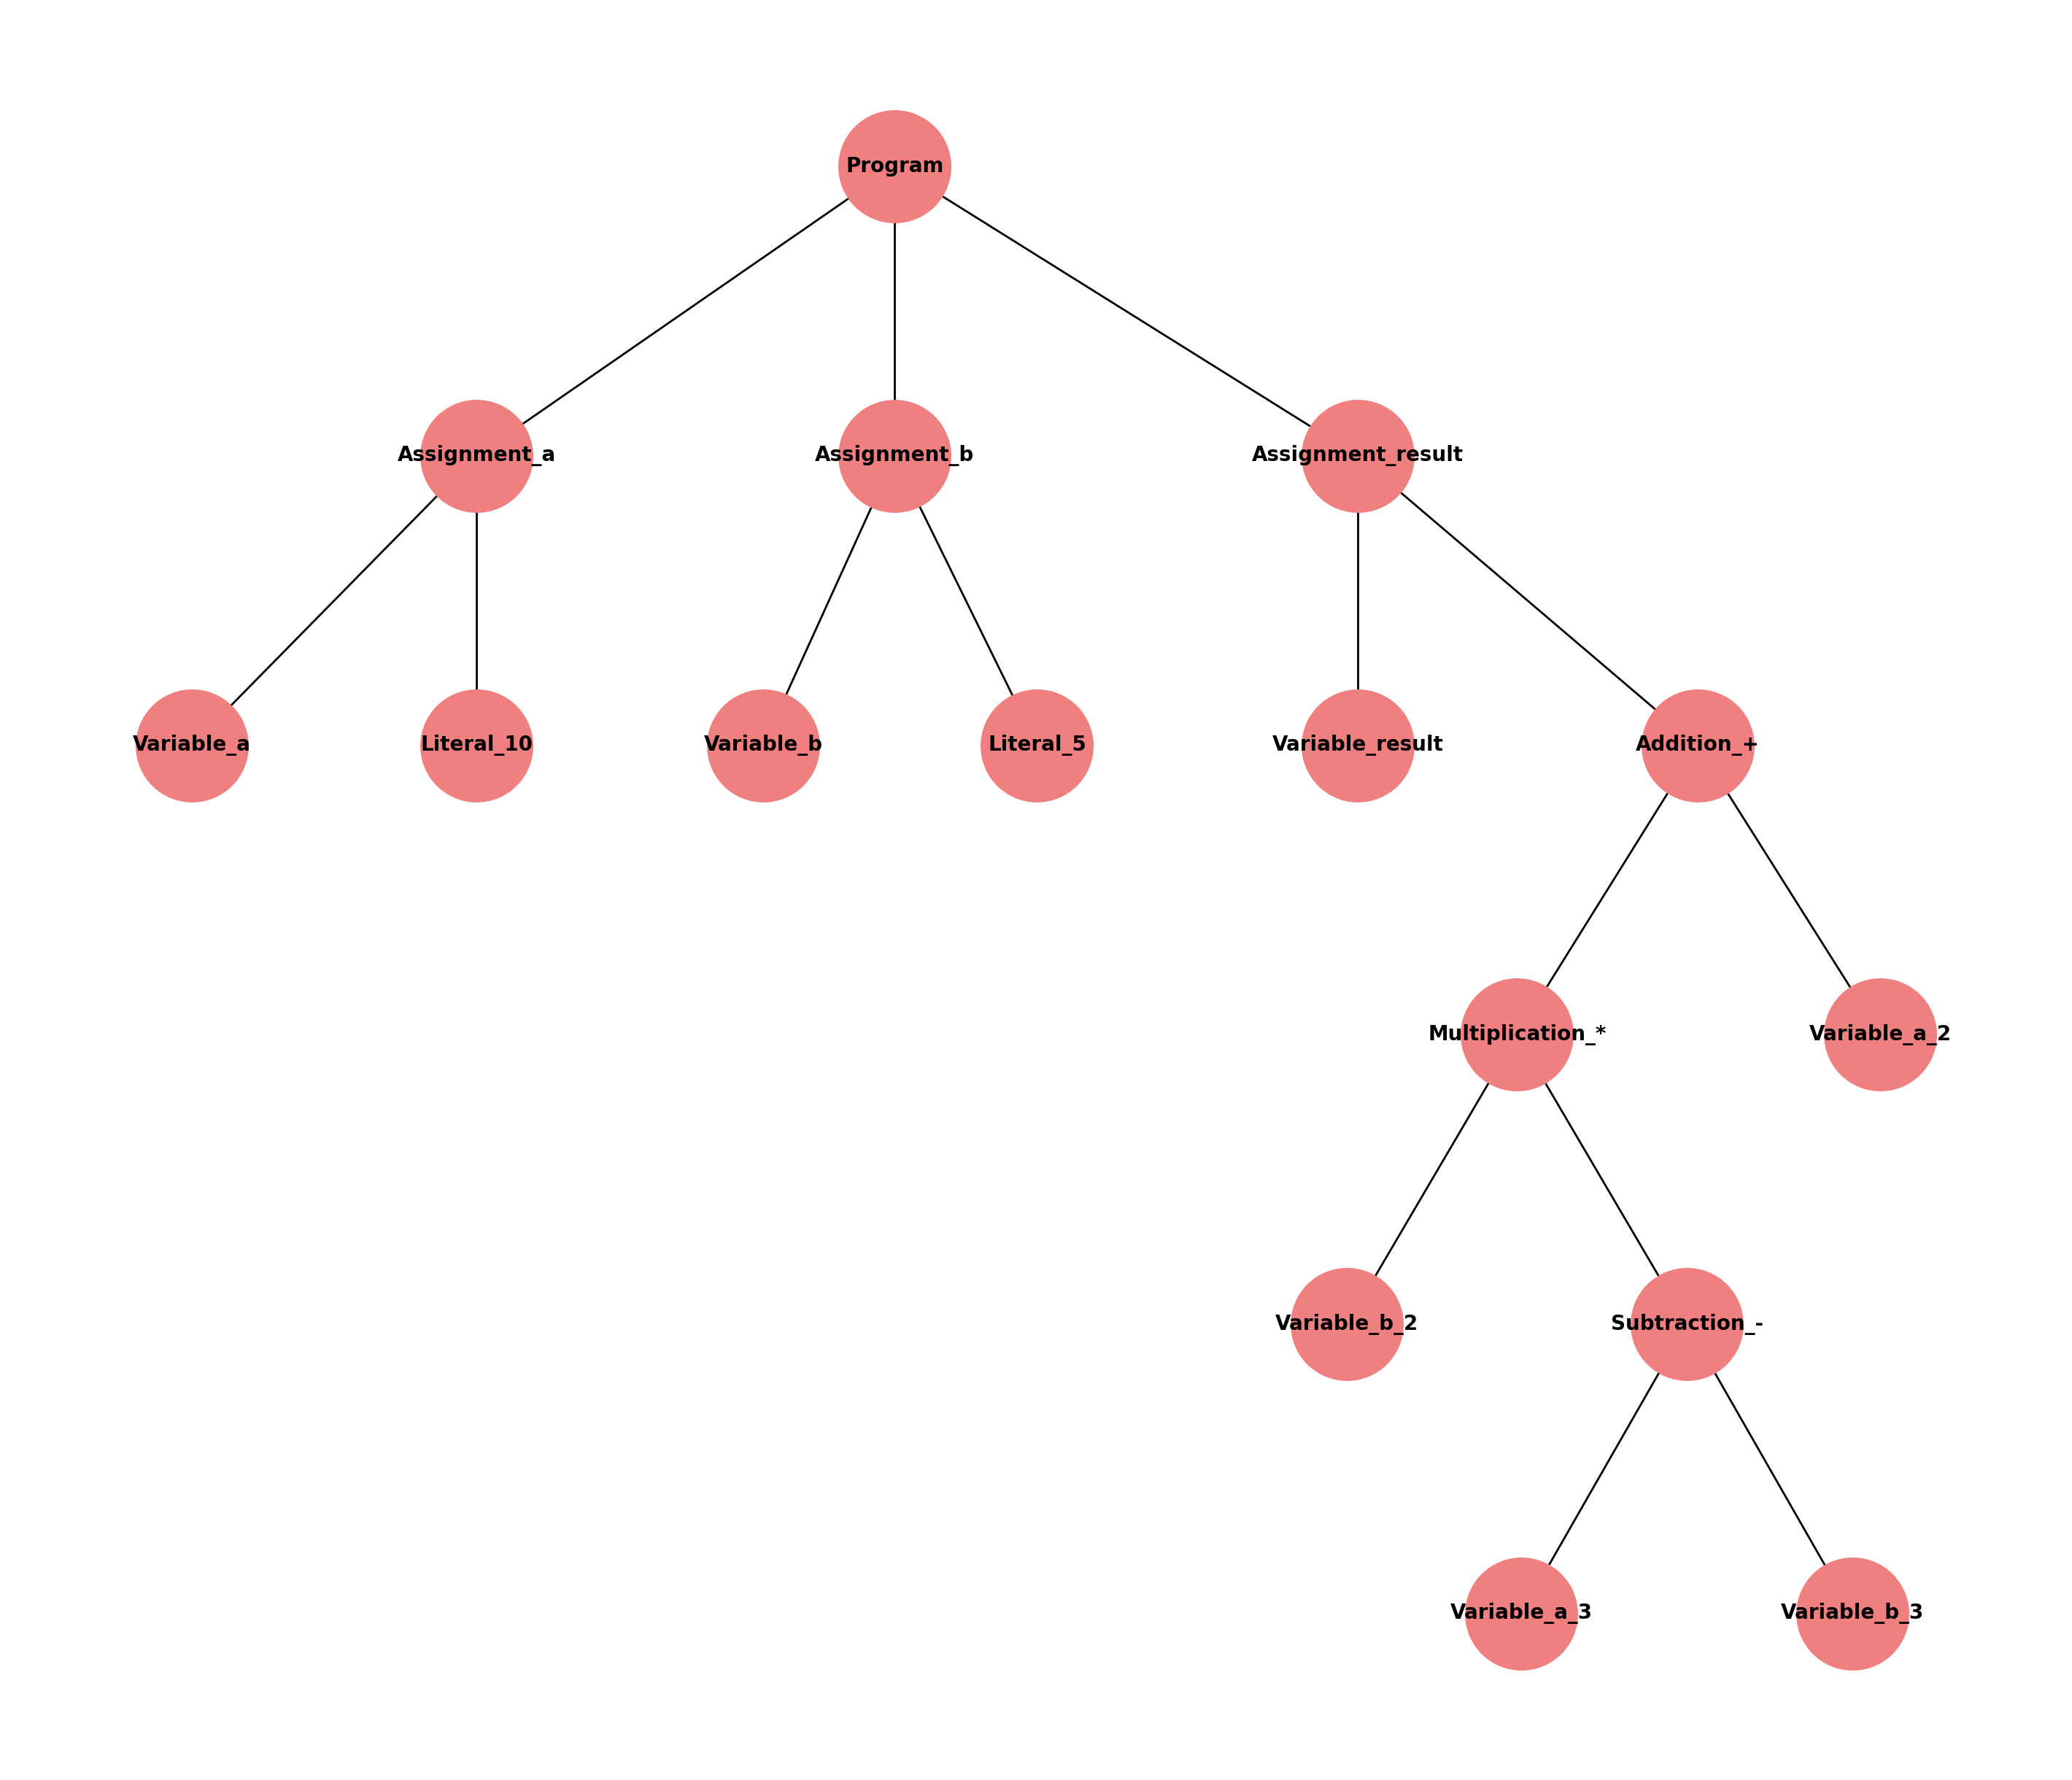
Review the Lexer: The lexer reads the input string and breaks it down into tokens such as numbers, operators, and parentheses.
Review the Parser: The parser uses recursive descent to parse these tokens into an AST according to the rules of operator precedence and expression structure.
Recursive descent parser - Wikipedia
Draw the AST for the expression 3 + 5 * (2 - 8)^2 to visualize the structure created by the parser.
Implement Missing Parser Logic: You may need to implement or correct parts of the parser, particularly focusing on creating nodes for different operations (+, -, *, /, ^).
Implementing Evaluation for the AST
Define AST Node Types: The AST includes a base class ASTNode, and you will extend it by creating subclasses for each type of operation:
NumberNodeto represent literal numbers.BinaryOpNodeas an abstract class for binary operations:- Specific subclasses for each binary operation, e.g.,
AddNode,SubtractNode,MultiplyNode,DivideNode, andExponentNode.
- Specific subclasses for each binary operation, e.g.,
- Implement
evaluate(): Each of these nodes should implement anevaluate()method. - Test your implementation with different expressions.
Postfix Expression Evaluation
Learn Postfix Notation: Postfix notation (RPN) places operators after operands, making it simpler to evaluate expressions without needing parentheses or operator precedence rules.
Reverse Polish notation - Wikipedia
Postfix Evaluator: Implement a PostfixEvaluator class that:
- Uses the lexer to tokenize a postfix expression.
- Uses a stack to store operands.
- Pops two operands from the stack for each operator and pushes the result back.
Evaluate Expressions: Test the PostfixEvaluator on several expressions and compare the results with those produced by the infix evaluator.
Caveat: Postfix expressions do not support unary operators directly. For the unary
-(negative) operator, we will use_in our inputs to distinguish the operation from binary subtraction. You can update the lexer to deal with this operator. In infix form, we can use_and-for unary minus because we can distinguish between the two use cases.
The remaining tasks in the assignment do not involve any submission but you will learn how to run and package your applications. So far, many of you may have run tests directly from your IDE You may have even executed the
mainmethod from the IDE. How do we run themainmethod of our program from the command line using gradle? How do we package all our classes into a JAR file for easy distribution? And you will see how we can automatically generate a lexer and a parser given a language's grammar.
Running a main Method using gradle
In your build.gradle file, you should add the Application plugin, like this:
plugins {
    id 'java'        // Apply the Java plugin
    id 'application' // Apply the Application plugin to run Java applications
}
You would also specify the class that contains the main method for your application by adding a block such as this:
application {
    mainClass = 'Main'
}
In the example above, the assumption is that we want to call the main() method in a class named Main that is in the top-level package (unnamed). In the case of this specific assignment, we want to run main in the Calculator class, and the class is in the arithmetic package. So the build.gradle would contain this block:
application {
    mainClass = 'arithmetic.Calculator'
}
We can now run the main method from the root directory of our project using the following command at the command line.
gradle runCommand Line Arguments
Directly Passing Command Line Arguments to the JVM
Thus far, we seem to have written programs where all the input has been directly provided to functions directly as arguments, either in a main method or in a test case. But that is not how we would normally provide inputs to a program. One way to provide an input to a program is through command line arguments.
If you have wondered why the signature for the main method includes a String[] args argument, now is the time to resolve that matter.
Let us take the example of our Calculator class that has a main method. After we build our project, the Calculator.class file should be in the directory build/classes/java/main/arithmetic. Let us change the working directory to build/classes/java/main. We would do this by using the following command at the command line:
cd build/classes/java/mainWe should be able to run the main method by invoking the Java Virtual Machine:
java arithmetic.CalculatorTake note of how we indicate the package name and the class when we provide Calculator to the JVM as the class that contains the main method we want to run. If Calculator does not have a public static void main(String[] args) method then we would get an error. Also notice that if we wanted to run main with gradle run we did not have to change our working directory (Gradle manages that detail for us).
Command-line arguments are a way to pass information to a Java program at the time it is executed. These arguments are passed as strings and can be accessed in the main method of your program. The args parameter in main is an array of String objects, where each element in args represents an argument passed from the command line. This allows you to supply values or configurations to your program dynamically when it starts, without modifying the code.
For instance, if we started our Calculator's main method as
java arithmetic.Calculator 5 + 3then the args array will have three elements: "5", "+", "3". We can access these Strings as args[0], args[1] and args[2] respectively. We can use args.length to determine in any command line arguments were passed to the program.
In our case, we may want to pass 5 + 3 as one single string that represents the expression to evaluate.
We would do so as
java arithmetic.Calculator "5 + 3"To actually use the command line argument, we would modify our main method in Calculator to be along the following lines:
package arithmetic;

import static java.lang.System;

public class Calculator {
    public static void main(String[] args) {
        if (args.length == 0) {
            System.out.println("Usage: java arithmetic.Calculator <arithmetic expression>");
            System.exit(-1);
        }
        String input = args[0];
        Lexer lexer = new Lexer(input);
        InfixParser parser = new InfixParser(lexer);
        ASTNode ast = parser.parse();
        System.out.println("AST: " + ast);
        System.out.println(ast.evaluate());
    }
}
In the example above, we used
System.exit()to terminate our program. (We also had to add animportstatement.) We used-1as the argument toexit(). If our program terminated normally then we would use0as the argument. The argument we pass toexit()is also called the status code when a program terminates. A non-zero status code typically means that program terminated because of an error. If we did not explicitly add a call toSystem.exit(), the Java compiler would -- in effect -- useSystem.exit(0);when a program terminates.
Passing Command Line Arguments Using gradle run
We saw earlier that if we set up gradle to run our application then we could so so using gradle run. To pass command line arguments in this approach we would add a flag when we invoke gradle run:
gradle run --args="arg1 arg2 arg3"Now arg1, arg2 and arg3 would be the three arguments passed to the program.
If we wanted to pass arguments that have spaces included then we would need to enclose such arguments with single quotes. For example:
gradle run --args="'5 + 3 * 2'"Passing Command Line Arguments using the IntelliJ IDEA IDE
Passing command line arguments using the IDE is a bit more cumbersome. You would have to follow these steps:
- Step 1: Open the Run/Debug Configurations
- In IntelliJ, go to the top menu bar and select Run > Edit Configurations.
- This will open the Run/Debug Configurations window where you can customize settings for running your application.
- Step 2: Specify Command-Line Arguments
- In the Run/Debug Configurations window, select your application configuration (e.g., the
Calculatorclass). - Look for the Program arguments field (usually under the Configuration section).
- Enter your command-line arguments in this field as you would from the command line:
- Separate multiple arguments with spaces.
- Enclose arguments containing spaces in quotes.
- Example: "10 + 5 * 3" "another argument". In this case:
args[0]will be "10 + 5 * 3" andargs[1]will be "another argument".
- In the Run/Debug Configurations window, select your application configuration (e.g., the
- Step 3: Apply and Run
- Click Apply to save your configuration.
- Click OK to close the Run/Debug Configurations window.
- Run your application by selecting Run > Run ‘YourConfigurationName’ or simply using the run button.
- Example for Single Argument
- If you’re passing a single arithmetic expression with spaces, enter it like this: "10 + 5 * 3" This will make the entire expression "10 + 5 * 3" available in
args[0].
- If you’re passing a single arithmetic expression with spaces, enter it like this: "10 + 5 * 3" This will make the entire expression "10 + 5 * 3" available in
IntelliJ will use these arguments each time you run the configuration. You would change the arguments in the Program arguments field to try new inputs to your program.
JAR Files and Bundling Classes
When we want to share our implementation with others, we may not always want to share our source code. Because Java programs run on a Java Virtual Machine, which is independent of the underlying hardware platform, we can share our compiled .class files with others. But if our application is complex and involves many classes then we would have to share all the .class files. In such situations, we can use JAR files.
JAR stands for Java Archive. A JAR file is a package format used by Java to distribute and deploy classes, resources, and metadata in a single, compressed file. JAR files simplify the distribution of Java applications and libraries by bundling all the necessary components into one file.
Key Features of JAR Files
- Bundling Multiple Files: JAR files package multiple Java .class files, images, configuration files, and other resources into one file.
- Compression: JAR files use ZIP compression, reducing file size and making distribution more efficient.
- Portability: Since JAR files are platform-independent, they can be run on any system with a Java Virtual Machine (JVM).
- Executable Archives: JAR files can be set up as executable files, making them self-contained applications that can be run with a single command.
- Library Distribution: JAR files are widely used to share Java libraries, making it easy to add external libraries to Java projects.
- Executable JARs: By specifying a main class in the JAR’s manifest file, JAR files can be made executable, allowing users to run the application by simply executing the JAR file.
Creating JAR files using Gradle
One can create JAR files using the Java compiler but Gradle can also make this easy. Creating a JAR file for your project with Gradle is straightforward. Your Gradle setup from earlier already has the necessary configuration to build a JAR file, thanks to the java plugin. By default, Gradle packages your compiled classes and resources into a JAR file when you run the build task.
You would add the following block to your build.gradle file to let Gradle know what the main class is, and you do this by referring to what has been set for the application plugin.
jar {
    manifest {
        attributes(
                'Main-Class': application.mainClass
        )
    }
}
You can explicitly create the JAR file using the following command at the command line (you can also select this Gradle task from the IDE):
gradle jarAfter the build completes, the JAR file will be located in the build/libs directory. The file name will typically be something like MyGradleProject-1.0-SNAPSHOT.jar, based on your project name and version. For our arithmetic expressions project, we may get the following JAR file: ArithmeticExpressions-1.0-SNAPSHOT.jar.
You can run the main method for the JAR file as follows:
java -jar build/libs/ArithmeticExpressions-1.0-SNAPSHOT.jarAutomatically Generating Lexers and Parsers
The lexer and parser that you used so far were hand-coded. The tools for computing systems have evolved to make it much easier to generate lexers and parsers for a given grammar. One such tool is ANTLR.
To use ANTLR, we would first re-write our grammar to suit ANTLR:
grammar Arithmetic;

// Parser rules
expr
    : '-' expr                    # UnaryMinusExpr       // Unary minus
    | expr '^' expr               # ExponentExpr         // Exponentiation
    | expr op=('*'|'/') expr      # MulDivExpr           // Multiplication and division
    | expr op=('+'|'-') expr      # AddSubExpr           // Addition and subtraction
    | '(' expr ')'                # ParenExpr            // Parentheses
    | FLOAT                       # FloatExpr            // Floating-point numbers
    ;

// Lexer rules
FLOAT
    : DIGIT+ '.' DIGIT* | '.' DIGIT+;  // Matches floating-point numbers
fragment DIGIT
    : [0-9];                          // Fragment rule to define digits

// Tokens for whitespace
WS
    : [ \t\r\n]+ -> skip;              // Skip whitespaces
We can provide this grammar as input to ANTLR and it would then produce the lexer and parser. One way to do this is to download and install ANTLR and invoke it from the command line:
antlr4 -Dlanguage=Java Arithmetic.g4In the command above, we are telling ANTLR that our grammar is stored in the file Arithmetic.g4 and that we want Java code for the lexer and parser. ANTLR will then generate the following files:
ArithmeticLexer.javaArithmeticParser.javaArithmeticBaseVisitor.java(if you want to use a visitor pattern)ArithmeticBaseListener.java(if you want to use a listener pattern)
We can then use this implementation to complete the parser.
But before we do so, I will add that one need not download and correctly install ANTLR from scratch. We can add rules to our build.gradle file to include ANTLR as a dependency and then to generate the Java files.
To do this, we add the following to build.gradle:
- In the
pluginssection, we add:id 'antlr' - In the dependencies section, we add:
antlr 'org.antlr:antlr4:4.9.3'(you can add the latest version, if you want)
By default, ANTLR source files (like Arithmetic.g4) should be in the directory src/main/antlr, which is the Gradle convention for source code. You can specify a different source directory (you can do this for Java too) by adding the following section for sourceSets:
sourceSets {
    main {
        antlr {
            srcDir 'src/antlr' // Specify your preferred directory
        }
    }
}
By including ANTLR as a plugin, we get a new Gradle operation that allows us to generate the Java code for lexing and parsing:
gradle generateGrammarSourceWe can also build all our code (grammar + Java code, say) using
gradle buildThe code that ANTLR generates is normally placed in build/generated-src/antlr/main and you can import those classes in your Java code.
We can now create our own ArithmeticParser using the ANTLR generate code.
import org.antlr.v4.runtime.*;
import org.antlr.v4.runtime.tree.*;

public class ArithmeticParser {
    public static void main(String[] args) throws Exception {
        String input = "3 + 5 * (2 - 8)^2 - -10";
        CharStream charStream = CharStreams.fromString(input);

        ArithmeticLexer lexer = new ArithmeticLexer(charStream);
        CommonTokenStream tokens = new CommonTokenStream(lexer);
        ArithmeticParser parser = new ArithmeticParser(tokens);

        ParseTree tree = parser.expr();
        System.out.println(tree.toStringTree(parser));

        EvalVisitor eval = new EvalVisitor();
        double result = eval.visit(tree);

        System.out.println("Result: " + result);
    }
}

/* Visitor implementation to evaluate expressions */
class EvalVisitor extends ArithmeticBaseVisitor<Double> {
    @Override
    public Double visitAddSubExpr(ArithmeticParser.AddSubExprContext ctx) {
        double left = visit(ctx.expr(0));
        double right = visit(ctx.expr(1));
        if (ctx.op.getType() == ArithmeticParser.ADD) {
            return left + right;
        } else {
            return left - right;
        }
    }

    @Override
    public Double visitMulDivExpr(ArithmeticParser.MulDivExprContext ctx) {
        // your code here
        return 0.0;
    }

    @Override
    public Double visitExponentExpr(ArithmeticParser.ExponentExprContext ctx) {
        // your code here
        return 0.0;
    }

    @Override
    public Double visitUnaryMinusExpr(ArithmeticParser.UnaryMinusExprContext ctx) {
        return -visit(ctx.expr());
    }

    @Override
    public Double visitParenExpr(ArithmeticParser.ParenExprContext ctx) {
        return visit(ctx.expr());
    }

    @Override
    public Double visitFloatExpr(ArithmeticParser.FloatExprContext ctx) {
        return Double.parseDouble(ctx.getText());
    }
}
Now you should have the tools to develop a parser for your own language (after you have defined its grammar)!
Summary
In this assignment, you explored the core components of parsing and evaluating arithmetic expressions in Java. You began by building a lexer to tokenize input expressions, then used a recursive descent parser to construct an Abstract Syntax Tree (AST) that captures the structure and precedence of operators in infix notation. By implementing specific
evaluate()methods within the AST nodes, you gained experience with recursive types, subtyping and working with abstract syntax trees.
You also implemented a stack-based approach to evaluate postfix (RPN) expressions, allowing you to compare infix and postfix notations and understand the efficiency of postfix for certain evaluation tasks.
You learned how to set up a Java project using Gradle, configure it to run, pass command line arguments, and package your application it into an executable JAR file.
Lastly, you should have learnt that it is possible to automatically generate lexers and parsers given a language's grammar because much of the code is direct string processing. ANTLR is one such tool and you should have gained some experience with ANTLR. You should have also realized that one need not manually download libraries in some situations; we can include these libraries as dependencies in our Gradle configuration file and Gradle will download and use these libraries (but we need to have access to the Internet for this to work).
This assignment should have provided you with skills in language processing, from lexing and parsing to expression evaluation and project setup.
Grading
You should submit your work by pushing your implementation for infix and postfix expression evaluation to Github. There is no submission on PrairieLearn.
A submission is partially correct for infix expression evaluation or postfix expression evaluation if it passes 80% (but not 100%) of the tests for that aspect of the assignment.
| Achievement | Grade |
|---|---|
| Neither evaluator is adequately complete | F = 0/10 |
| Partial correctness for both evaluators | C = 5/10 |
| One evaluator is fully correct; the other is missing or is incorrect | C+ = 6/10 |
| One evaluator is fully correct and the other is partially correct | B = 7/10 |
| Both evaluators are fully correct | A = 9/10 |