Overview
In this assignment, you will build a client-server application that calculates document metrics for URLs provided by the client. You will implement (modify) a Java server that accepts requests containing URLs, retrieves the content of each URL, and computes various text metrics, including average word length, unique word ratio, and hapax legomena ratio. The client will send JSON requests to the server and display the metrics received in the JSON response. You will update the server to utilize different forms of concurrency. You will also gain an understanding of how to test concurrent programs, and your will be exposed some other software deployment technologies and techniques.
❗️For certain aspects of this assignment, you may have to make adjustments based on the version of Gradle that you are using.
ℹ️ Also read: The Build Process and Build Tools and Lab 9.
Learning Outcomes
Network Communication with Sockets
Understand and implement basic client-server communication using Java sockets.
Establish a reliable connection between a client and server for data exchange.
JSON Parsing and Data Exchange
Use JSON as a data format for information exchange.
Employ the Gson library to parse JSON requests and construct JSON responses.
Develop a structured request-response format for exchanging data between distributed components.
Concurrent Processing in Java
Use multithreading to enable the server to handle multiple clients at the same time.
Identify opportunities for parallel processing of client requests.
Apply safe approaches to parallel data processing.
Extended Use of Command Line Arguments
Use command line flags to pass parameters to a program.
Use Gradle settings for default command line arguments.
File and I/O Handling
Read and process URLs from an external text file on the client side.
Manage input and output streams for communication over sockets in a structured and efficient manner.
Analyze the benefits and limitations of parallel processing in handling multiple client requests.
Software Operations and Deployment
Configure Gradle to run multiple
mainmethods.Configure Gradle to produce multiple executable JAR files.
Package dependencies into JAR files to create standalone executables for both client and server applications.
Set up a Java project with distinct client and server applications using a single Gradle project.
Organize code and build configurations for maintainable and scalable software projects.
Use Docker containers to easily share and deploy applications.
Text Document Metrics
In this assignment, the computational tasks involve computing certain metrics for text documents.
- Average Word Length (AWL): This metric calculates the average length of words in the document. By iterating over all words, summing their lengths, and dividing by the total word count, this measure gives a sense of the text’s linguistic complexity and verbosity.
- Unique Word Ratio (UWR): This metric computes the ratio of unique words to the total number of words. It is calculated by identifying all unique words (ignoring case) and dividing the unique word count by the total word count. This ratio helps understand lexical diversity—how varied the vocabulary is within the text.
- Hapax Legomena Ratio (HLR): This metric represents the ratio of words that appear only once (known as “hapax legomena”) to the total word count. By isolating words that appear a single time and dividing by the total word count, this metric offers another measure of text, highlighting the proportion of unique and rarely used words. For some linguistic analysis, one excludes the hapax legomena because they are considered outlier words.
The server will receive a list of documents to process. The documents are specified by URLs for their content. The server should extract the text given the URL and compute the three metrics: AWL, UWR and HLR.
Introduction to JSON
JSON (JavaScript Object Notation) is a lightweight, text-based data interchange format that is easy for both humans to read and for machines to parse and generate. JSON is widely used for transmitting data between a server and a web application as it is language-independent and supported across various programming languages, including Java. JSON represents data as a collection of key-value pairs, where values can be strings, numbers, arrays, booleans, or even nested JSON objects. Its simplicity and readability make it ideal for structured data exchange in client-server architectures.
Before we describe the specific JSON format for this assignment, let’s look at a simple JSON structure to understand its basic format and data types:
{
  "name": "Alice",
  "age": 30,
  "isStudent": false,
  "skills": ["Java", "Python", "JavaScript"],
  "address": {
    "street": "123 Main St",
    "city": "Wonderland",
    "postalCode": "W12345"
  }
}
In this example, we have the following keys:
name: A string value (“Alice”).age: A numeric value (30).isStudent: A boolean value (false).skills: An array of strings ([“Java”, “Python”, “JavaScript”]).address: A nested JSON object with its own key-value pairs.
This simple JSON format showcases how different types of data—strings, numbers, booleans, arrays, and nested objects—can be structured within JSON.
There are several libraries that simplify interaction with data in JSON format. We will use the Gson library.
For the example with Alice, we can set up a Java class to represent the structure of the data:
import java.util.List;

class Person {
    private String name;
    private int age;
    private boolean isStudent;
    private List<String> skills;
    private Address address;

    public String getName() { return name; }
    public void setName(String name) { this.name = name; }

    public int getAge() { return age; }
    public void setAge(int age) { this.age = age; }

    public boolean isStudent() { return isStudent; }
    public void setStudent(boolean student) { isStudent = student; }

    public List<String> getSkills() { return skills; }
    public void setSkills(List<String> skills) { this.skills = skills; }

    public Address getAddress() { return address; }
    public void setAddress(Address address) { this.address = address; }
}

class Address {
    private String street;
    private String city;
    private String postalCode;

    // Getters and Setters
    public String getStreet() { return street; }
    public void setStreet(String street) { this.street = street; }

    public String getCity() { return city; }
    public void setCity(String city) { this.city = city; }

    public String getPostalCode() { return postalCode; }
    public void setPostalCode(String postalCode) { this.postalCode = postalCode; }
}
Data in JSON format is, fundamentally, a string that needs to be parsed. Gson parses the data for us and allows us to interact with JSON data as well as constructing JSON strings.
Here is an example using Gson:
import com.google.gson.Gson;

public class GsonExample {
    public static void main(String[] args) {
        String json = """
        {
          "name": "Alice",
          "age": 30,
          "isStudent": false,
          "skills": ["Java", "Python", "JavaScript"],
          "address": {
            "street": "123 Main St",
            "city": "Wonderland",
            "postalCode": "W12345"
          }
        }
        """;

        // Create a Gson instance
        Gson gson = new Gson();

        // Parse JSON string into a Person object
        Person person = gson.fromJson(json, Person.class);

        // Access fields from the parsed object
        System.out.println("Name: " + person.getName());
        System.out.println("Age: " + person.getAge());
        System.out.println("Is Student: " + person.isStudent());
        System.out.println("Skills: " + person.getSkills());
        System.out.println("Address:");
        System.out.println("  Street: " + person.getAddress().getStreet());
        System.out.println("  City: " + person.getAddress().getCity());
        System.out.println("  Postal Code: " + person.getAddress().getPostalCode());
    }
}
If we run main above then the output should be:
Name: Alice
Age: 30
Is Student: false
Skills: [Java, Python, JavaScript]
Address:
  Street: 123 Main St
  City: Wonderland
  Postal Code: W12345
What were the steps we used?
- Creating Classes: We created
PersonandAddressclasses to match the structure of the JSON. Each JSON field has a corresponding Java field with appropriate data types. - Using
Gsonto Parse JSON: Thegson.fromJsonmethod converts the JSON string to aPersonobject. Gson automatically maps JSON fields to the corresponding fields inPersonandAddress. (It used a set of techniques that are generally bundled into the term reflection.) - Accessing Data: After parsing, we can access any field within the
Personobject, including nested fields likeaddress.city.
We can also convert a Person instance to a JSON string format:
String personJson = gson.toJson(person);
System.out.println(personJson);
JSON Structure for Client-Server Communication
In this assignment, we will use the a specific JSON format for the client and server to send messages to each other. The client will send requests with a specific structure and the server will respond with a specific structure.
Structure for Client Requests
The client will send a request that adheres to the following template:
{
  "requestId": "unique_id_12345",
  "urls": [
    "http://example.com/doc1.txt",
    "http://example.com/doc2.txt"
  ]
}requestId: A unique string identifier for the request.urls: An array of URLs pointing to text documents.
Structure for Server Response
The server responds with a JSON object that includes the requestId and metrics for each document:
{
  "requestId": "unique_id_12345",
  "metrics": {
    "http://example.com/doc1.txt": {
      "averageWordLength": 4.5,
      "uniqueWordRatio": 0.72,
      "hapaxLegomenaRatio": 0.25
    },
    "http://example.com/doc2.txt": {
      "averageWordLength": 4.2,
      "uniqueWordRatio": 0.68,
      "hapaxLegomenaRatio": 0.18
    }
  }
}requestId: The same ID provided in the client request for tracking purposes.metrics: An object where each URL is a key, and its value is another JSON object containing:averageWordLength: The average length of words in the document.uniqueWordRatio: The ratio of unique words to the total number of words.hapaxLegomenaRatio: The ratio of words appearing exactly once to the total word count.
Main Tasks
For this assignment, the graded tasks are:
Computing the document-level metrics;
Enabling parallel document processing;
Modifying the server to handle multiple clients concurrently.
You are provided most of the code for the client and the server, including the code that does the JSON processing. You should use the provided code as an example to learn from so that you can apply similar approaches in other assignments and projects.
The primary computational task in this assignment will benefit from parallel processing because each client sends a request with multiple documents to process.
You can use stream processing (especially parallel streams) or the ForkJoin framework to benefit from the inherent parallelism in the task. Sometimes these tasks are called embarrassingly parallel -- although we may not always see significant performance gains even when there is such parallelism because of system-level overheads.
To approach this assignment, first focus on implementing the items marked with
TODOin the code. All your work is going to be inDocumentMetricsServer.
Begin by implementing the computation of the three metrics. Each of these computations is encapsulated in a method that processes an array of
Strings.
    /**
     * Calculates the average length of words in the given array of words.
     *
     * @param words an array of words in the document.
     * @return the calculated average word length.
     */
    private static double computeAverageWordLength(String[] words) {
        // TODO: implement this method
        return 0.0;
    }

    /**
     * Computes the ratio of unique words to the total word count.
     *
     * @param words      an array of words in the document.
     * @return the unique word ratio.
     */
    private static double computeUniqueWordRatio(String[] words) {
        // TODO: implement this method
        return 0.0;
    }

    /**
     * Computes the ratio of hapax legomena (words that appear exactly once) to the total word count.
     *
     * @param words      an array of words in the document.
     * @return the hapax legomena ratio.
     */
    private static double computeHapaxLegomenaRatio(String[] words) {
        // TODO: implement this method
        return 0.0;
    }
You should then resolve the
TODOinrespondToClient. Prior to that point, aListwith the URLs sent by a client has been extract from the JSON-formatted request. Now you can use methods such asfetchContentFromURLto obtain aStringthat represents a document and then callcomputeMetrics.computeMetricssplits a document into words and calls the individualcomputemethods you should have implemented in the previous step. Here is where you can process the documents sequentially or in parallel.Finally, head to the
TODOinstartServiceand add support for a multithreaded server that will handle each client in a separate thread.
For this assignment, spend some time reading the provided code.
See how we can process JSON strings.
See how we can stop servers [somewhat] gracefully. Pay attention to the use of
AtomicBoolean.See how we can create test cases for multithreaded programs.
See how we generate identifiers using Sqids. (The use here is not very good, but it is an example.)
Testing Concurrent Programs
Testing concurrent programs is hard. The challenge of ensuring that concurrent programs are correct, relative to sequential programs, is that we now also need to reason about the numerous ways in which the concurrent threads of execution interleave with each other, and there are many such interleavings. We have to think carefully about the interleavings, and we also have to rely on the guarantees that properties such as immutability provide (because we know that such invariants hold across all interleavings).
You have been provided with some example tests that create a server and a client, and that use multiple threads to interact with the server. The tests are examples to help you develop your own testing practices. In this assignment, you do not need to submit additional tests but you should think about how you will test other concurrent programs.
Running the Server and the Client from the Command Line
When we work with multiple programs that talk to each other, we benefit from being able to start each program from the command line, each in a separate terminal window, so that we can observe what each program does independently. (We should also use the debugger.)
The main methods for the server and the client take arguments at the command line, and these arguments are contextualized using flags that start with --. For example, we want to start the multithreaded version of a server when we using the command line flag --multithreaded true. (Read the code to understand the different command line flags and how they are parsed.) Your implementation for the server should use the single-threaded or multithreaded version based on the flag we used as an example.
The provided build.gradle file also defines Gradle tasks for starting the server and the client, and with different default arguments.
Let us consider this example:
tasks.register('runServerSTSQ', JavaExec) {
    mainClass = 'documentmetrics.server.DocumentMetricsServer'
    classpath = sourceSets.main.runtimeClasspath
    args = ['--port', '8084', '--multithreaded', 'false', '--parallelism', 'false']
}
We are defining the Gradle task runServerSTSQ that runs the server with the specified flags. We would invoke this Gradle task at the command line as:
gradle runServerSTSQThis is similar to the following (assuming you are in the correct working directory):
java documentmetrics.server.DocumentMetricsServer --port 8084 --multithreaded false --parallelism falseIn your IDE, in the Gradle pane or view, you should see all the tasks that have been registered using the build.gradle file, and you can invoke the tasks from there too.
Read the provided code for the server and the client with some care so that you can identify some useful idioms. Also examine the
build.gradlefile so that you know a bit more about configuring your Gradle-based build process.
The remaining tasks in the assignment do not involve any submission but you will learn what software containers are and you will learn how you can get started with Docker, which is a popular tool for software containerization.
Containers and Docker
What are Containers?
Containers are lightweight, portable, and self-contained environments that package an application along with all its dependencies, libraries, and configuration files. Unlike virtual machines, which include an entire operating system, containers share the host system’s OS kernel but isolate applications in separate environments. This makes containers significantly more efficient in terms of resource usage and startup time compared to traditional virtual machines.
Containers allow developers to build applications that can run consistently across different environments. Once a containerized application is built, it can be deployed and run on any system with a compatible container runtime, regardless of the underlying OS and software configuration. This makes containers ideal for microservices, distributed applications, and any project where consistency and scalability across different environments are essential.
What is Docker?
Docker is an open-source platform that automates the creation, deployment, and management of containers. It provides tools and a runtime environment to package applications into containers and ensures that these containers run reliably across various computing environments. Docker simplifies working with containers through its:
- Docker Engine: The core runtime that manages container creation and execution.
- Docker CLI: A command-line interface to build, run, and manage containers.
- Docker Hub: A cloud-based registry where users can share and download prebuilt Docker images.
With Docker, you can create a Docker image (a blueprint for creating containers) that includes your application code, dependencies, libraries, and environment configurations. Once the image is created, you can run multiple instances of it as containers on any Docker-enabled system, ensuring that your application runs the same way in development, testing, and production.
A Docker image is a snapshot of an application and its environment, defining what will be run in a container. An image is built from a Dockerfile, a script with instructions on how to set up the environment for the application.
A Docker container is a runtime instance of a Docker image. Containers are isolated and have their own filesystem, networking, and process space, even though they share the host OS kernel.
A Dockerfile is a text file containing instructions to assemble a Docker image. It specifies steps like setting up the base OS, installing dependencies, copying application files, and defining the command to run the application.
Docker Hub, like GitHub, is a repository service provided by Docker where users can store and share images, making it easy to distribute containerized applications.
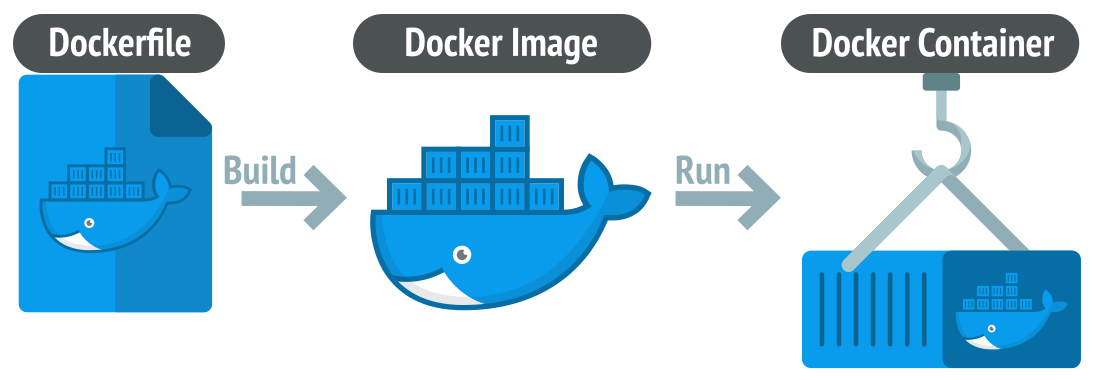
There is much to learn about Docker but we will provide a short starting point.
Creating a Docker Image and Container for the Server and the Client
Suppose we want to make it easy for others to run our server and client, we can create Docker images for these applications.
To create Docker images for both the server and client in this assignment, you’ll need to write two separate Dockerfiles—one for the server and one for the client. Each Dockerfile will define the specific environment, dependencies, and entry point for running each application.
Before you complete the remaining steps (which you should do if you want to understand what Docker is all about), you should install Docker first. Then continue.
Setting up Dockerfiles
We could structure our source code directories in different ways to create Docker images. One approach is the following directory structure that separates the server and the client:
project-root/
├── client/
│   ├── Dockerfile        # Dockerfile for the client
│   └── build.gradle      # Gradle build file for client
├── server/
│   ├── Dockerfile        # Dockerfile for the server
│   └── build.gradle      # Gradle build file for server
└── shared/
    ├── src/              # Source code shared by both client and server (if any)
    └── build.gradle      # Main Gradle file for the project
We have a different structure for our codebase at this point, because the server and the client are in the same src directory. We will, therefore, use different names for the two Dockerfiles and that will give us this structure:
project-root/
├── Dockerfile.server      # Dockerfile for the server
├── Dockerfile.client      # Dockerfile for the client
├── build.gradle           # Gradle build file for the whole project
├── src/                   # Source code for both client and server
│   ├── main/
│   │   ├── java/
│   │   │   ├── documentmetrics/server/DocumentMetricsServer.java
│   │   │   └── documentmetrics/client/DocumentMetricsClient.java
The Dockerfile.server will look like this:
# Use the official OpenJDK image as a base
FROM openjdk:17-jdk-slim

# Set the working directory in the container
WORKDIR /app

# Copy the build files to the container
COPY . /app

# Build the server JAR file
RUN gradle serverJar -x test

# Expose the server port (replace with the actual port number)
# Because Docker emulates the OS, we need to allow network connections
EXPOSE 8087

# Set the default command to run the server JAR
CMD ["java", "-jar", "build/libs/DocumentMetricsServer-1.0.jar", "--port", "8087", "--parallelism", "true"]
Let us understand the components of the Dockerfile:
- Base Image: We start with
openjdk:17-jdk-slimas it provides a lightweight Java environment. - Working Directory: Set to
/appin the container where all subsequent commands will execute. We are telling Docker that there should be a directory/appwhere our application should be placed. - Copy Files: The
COPYcommand copies all files from the current directory (including source and Gradle files) into the container. - Build JAR: The
RUNcommand uses Gradle to build the JAR file for the server using theserverJartask that is defined inbuild.gradle. The server JAR is placed in thebuild/libsdirectory. - Expose Port: Specify the port that the server will listen on (in this case, 8087).
- Run Command: The
CMDcommand specifies the default command to run the server JAR when the container starts.
The Dockerfile.client will look like this:
# Use the official OpenJDK image as a base
FROM openjdk:17-jdk-slim

# Set the working directory in the container
WORKDIR /app

# Copy the build files to the container
COPY . /app

# Build the client JAR file
RUN gradle clientJar -x test

# Specify the default command to run the client JAR
CMD ["java", "-jar", "build/libs/DocumentMetricsClient-1.0.jar", "--server", "localhost", "--port", "8087"]
Since the client does not need to expose any ports (it only initiates requests to the server), we skip the EXPOSE command.
Building the Docker Images
When both Dockerfiles are in the same directory, you need to specify the Dockerfile to use when building each image. Here’s how you can build the images:
# Build the server image using Dockerfile.server
docker build -f Dockerfile.server -t document-metrics-server .

# Build the client image using Dockerfile.client
docker build -f Dockerfile.client -t document-metrics-client .
Running the Docker Containers
- Create a Docker network
docker network create document-metrics-networkThis step is optional. You should do this if running both containers locally and you need them to communicate by name.
- Run the Server container
docker run --network=document-metrics-network -p 8087:8087 --name document-metrics-server document-metrics-serverThis command maps port 8087 on your local machine to port 8087 in the container, making the server accessible at http://localhost:8087.
- Run the Client Container
docker run --network=document-metrics-network document-metrics-client --server document-metrics-server --port 8087 --urls /path/to/urls.txtPassing Arguments in Docker
When running a JAR in a Docker container, you can pass arguments by specifying them after the java -jar command in the CMD instruction in the Dockerfile or when running the container.
Option 1: In the Dockerfile
CMD ["java", "-jar", "DocumentMetricsClient.jar", "--server", "localhost", "--port", "8087", "--urls", "urls.txt"]Option 2: Overriding Arguments at Runtime
docker run document-metrics-client --server localhost --port 8087 --urls urls.txtSummary
If you completed this assignment, you would have developed and deployed a client-server application and gained experience with network programming, concurrent execution, and JSON data processing. You would have also gained some insights into testing concurrent programs.
If you invested time in all aspects of the assignment then you would have understood much more about using Gradle and also software containers. By leveraging tools like Docker, you can ensure that both the client and server applications can run consistently across different environments, highlighting the portability and scalability that containers provide in modern software development.
This assignment should have provided a short journey through building, testing, and deploying a client-server system, reinforcing skills that are crucial in software development, cloud computing, and DevOps workflows.
Grading
You should submit your work by pushing your code to GitHub. There is no submission on PrairieLearn.
| Achievement | Grade |
|---|---|
| Computing Document Metrics | 3 / 9 |
| Parallel Processing of Requests from One Client | 3 / 9 |
| Serving Multiple Clients Concurrently | 3 / 9 |